Theremin Fountain with C# and the Arduino Uno
Alex Sparkman (@alexpsparkman)
august 7th, 2014

I want to create a fountain that can entertain guests. Namely, I want to be able to control the flow of the fountain with my hand. Recently, at our last summit, Jay Hannah introduced me to the Leap Motion, which is basically a Kinect for the hands. A little research introduced me to Arduino, an open source solution for programming microcontrollers.
The fountain will be built using base electrical components. The actual physical basins for the water may be taken from an existing fountain, but I plan on making that decision later. This post details my initial goals for the project, as well as the first steps I took towards a side-project, and the coding hurdles I had to overcome to complete the side-project.
My Initial Project Goals
I need a protocol for reliable in-order communication. Transmitting data over wires involves sending a signal over a wire. Of course, signals may be changed by electro-magnetic radiation. Consequently, communication over wires is not error proof. This means that I need an algorithm that can detect mistakes.
I need housing for the electrical components that insulates from humidity and moisture. A failure with a project like this could potentially result in moldy carpet. This is mainly a safety precaution, but it offers an opportunity to take my electronic projects outdoors.
Since the project is going to be outside, I need to be able to communicate to the device wirelessly. In addition, the Leap Motion is bound to a device that has a little more computing power than a microcontroller. The device I plan to use is either my desktop, or my laptop.
I need multiple circuits to be able to work together with incompatible voltages. The microcontroller has a max operating voltage of five volts. Most commercially available direct current pumps have a minimal operating voltage of about 12 volts. Connecting the microcontroller circuit with the water pump circuit will fry the microcontroller.
I want the wiring to be out of the way, but disconnectable. I want the fountain to be aesthetically pleasing. In my experience, if a wire is out of the way, it usually means it is less accessible. The right balance will likely require some experience.
My First Steps
I decided the best way to complete this project is to complete some mini-projects. The large project has a large price tag. I am new to circuits. Circuits cost money, and can easily be damaged if not handled correctly.
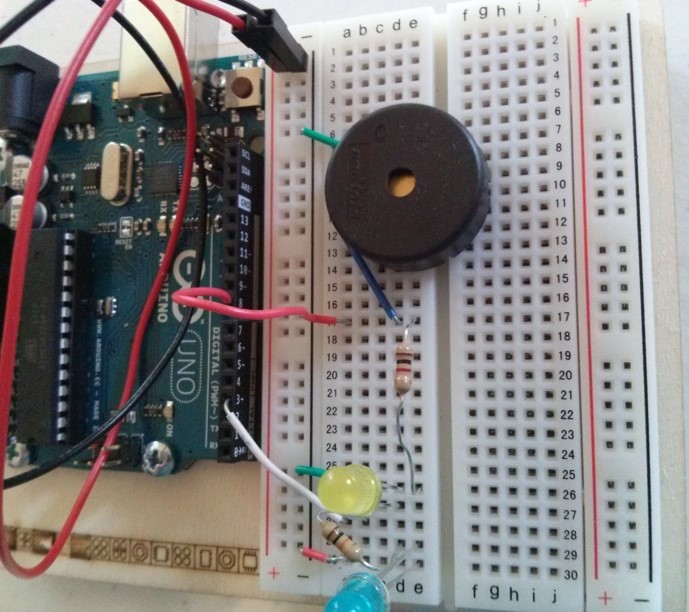
This post describes my first project — a theremin. A theremin is a musical instrument whose pitch is controlled by the position of the player’s hand in the air. My theremin consisted of a Leap Motion, a laptop, Arduino, and a piezo. The Leap Motion detected the hand, the computer interpreted the hand’s position, translated it into bytes, and sent it over the port. The Arduino received the bytes from the computer, and controlled the piezo through pulse width modulation.
This mini-project shares the goal of creating a reliable in-order communication protocol. I hope this can serve as a guide to other developers looking to implement a reliable in-order communication protocol for their Arduino project. Alternatively, you can use my solution in your own project!
The Code
The code for the project is available on my GitHub account. It is split into three parts. The computer code written in C# is available in the folders beginning with APS. The documentation is available in the folder named Docs. Finally, the Arduino code written in C++ is available in the fountain folder. The wiring is as shown.
I have met all the goals for the communication protocol laid out above. The messages that are sent ignore all the associated timing data, and just play the most recently sent note for 100 milliseconds. Adapting the Arduino code to use the timing data will require the use of interrupts that use the on-chip timers. Those interrupts are abstracted away from the open source Arduino code. Thus in order to use timer-based interrupts I need to spend time finding the applicable sections in the 660 page datasheet.
The Pitfalls
Missing Bytes
The first problem I ran into was that the Read methods of the .NET SerialPort class would skip bytes that had errors. It would not throw an exception or indicate an error.
I added a stop and start byte, an escaping scheme, and a fixed length to all messages. The message layouts can be viewed in the Excel spreadsheet in the project’s GitHub repo. The ESCAPE byte is always greater than 192, meaning it will never be treated as a start or stop byte. The SIZE_SEQ byte, as well as all the INFO_X bytes are escaped by setting the bit of the ESCAPE byte according to its position after the ESCAPE byte.
Once the message was modified to have a clear start and beginning, I added a 1-bit sliding window protocol to control retransmission of erroneous bytes. Basically, the sequence number (0 or 1) is tracked on both sides. When a new message is sent the sequence number is inverted. A new message is only sent once the last message has been acknowledged by the receiver through an ACK message, until that time the last message is resent every so often. The C# code for this is seen in the Run method of the Arduino class. The C++ code for this is seen in the implementation of the waitForMessages function in comm.cpp.
The next problem that I ran across was on the Arduino side. The Arduino would not read a full message, which caused it to not send or receive.
The readBytesUntil(character, buffer, length) function documentation and output was unclear. The function would read bytes into the buffer until the character specified was detected, the length was reached, or the operation timed out. The function returned an integer indicating the number of bytes read into the buffer. The function would detect the character, but would not write it into the buffer. This meant determining the terminating condition was impossible without a call to peek() to determine the next byte on the stream.
I fixed the problem by modifying the implementation of the readByteUntil method in the Stream class.
// as readBytes with terminator character terminates if length
// characters have been read, timeout, or if the terminator character
// detected returns the number of characters placed in the buffer (0
// means no valid data found)

size_t Stream::readBytesUntil(char terminator, char *buffer, size_t length)
{
  if (length < 1) return 0;
  size_t index = 0;
  while (index < length) {
    int c = timedRead();
    if (c < 0) break;
    *buffer++ = (char)c;
    index++;
    if (c == terminator) break;
  }
  return index; // return number of characters, not including null terminator
}
Arduino Connection Problem
I only have three USB ports, which means I have to constantly plug and unplug my Arduino. During the debugging process, I found it useful to have an identification sequence. If the Arduino board could not be identified, I wrote this to the console. In order to do this, the code sends two randomly generated bytes to the Arduino in an IDENTIFY message. In response the Arduino increments those two bytes, and sends them back. After a certain number of retries the computer will stop trying.
The first IDENTIFY sequence that I developed sent over a blank message and did not expect an arbitrary calculation to be performed on the data. This gave me false positives. My mouse identified itself as the Arduino, because it reflected that exact message back. The sizes for the receive and transfer messages at that time were the same which made this possible.
Identification Problem
After I had added the IDENTIFY sequence, I noticed it wouldn’t identify after restarting the program. The IDENTIFY sequence would leave the Arduino expecting a 1 sequence number. The computer would send a 0 sequence number. The identification process would continue until it ran out of retry attempts.
In order to fix this, I added a process to get the expected sequence number from the Arduino. I made it so that Arduino would always be sending an acknowledgement. Before receiving a message from the computer, the Arduino would be sending an acknowledgement for the message it knew it wouldn’t be receiving first thing from the Arduino. The Arduino was previously sending an ACK message until the next message arrived. The computer code was modified to read the messages being sent from the Arduino to get the sequence number it was expecting. It would then begin the IDENTIFY sequence.
This fixed the identification problem.
Time-Delayed Halt of Transmission
After implementing the messaging scheme, I could run the program without any communication errors, however as time went on the communication slowed and eventually halted. From experience, I suspected the cause was that a buffer was blocking code execution. The 1-bit sliding window protocol meant that the Arduino was always sending. The class that was reading from the SerialPort was only reading one message at a time. If the Arduino was communicating at a faster rate than the computer was reading, then its buffer would eventually fill up.
My original guess at the cause was correct: a buffer was filling to its brim, and halting code execution. I did not implement the fix until after reading the documentation more thoroughly. The solution to fix this problem is to discard the buffer when it becomes too full. My first guess involved a call to DiscardInBuffer(). This discarded the driver’s buffer not the program’s internal buffer. After reading the documentation, I changed it to call the ReadExisting() method. I chose the DiscardInBuffer() over ReadExisting() initially, because I did not want to allocate memory for a large string when I would be discarding it anyways.
This fixed the halt of transmission.
The End-Product
The communication protocol is now established. The major pitfalls of communication have been identified. The following shows a demonstration of the working theremin.
I feel pretty confident moving to my next mini-project, which will be a completely autonomous plant watering system. It moves away from the coding and will hopefully give me experience making a project housing and working with separated electrical circuits.